Tuesday 30 August 2016

CASEing a Card (CASE = cardmaking term for CopyAndShareEverything)


Jo's original card
Jill's CASEd card

As a beginner card maker, I often  found myself wanting to copy cards we made in the classes I went to in EVERY detail – measurements and positions exact to the millimetre, colours matched perfectly, exact products and embellishments used.
I now try hard not to do this, but I recently needed a card in a hurry and had planned to CASE one of Jo’s cards. Things however did not go quite as planned.


I thought I would share my thought processes involved in the process, in the hope of encouraging people to change cards to suit the product they have at home.

1.       Spend an hour searching for the Couture Creations 6” x 6” paper pad that I knew I had ‘somewhere’. It is purple – I must have bought this one! Found it eventually, but it was NOT the one Jo used. Mine was pink  - pretty, but not what Jo had used. Oh no – what do I do now?
2.       Find an alternative paper pad (Kaisercraft, from years ago) with three sheets of coordinating paper and choose cardstock to match. Cut these to size (tempted, but no I did NOT measure Jo’s card), and cut matching backing layers from card.
3.       Choose Brushed Corduroy Distress Ink to sponge around the edges of the paper panels. Drat – I meant to choose Frayed Burlap ink – hope no one will notice the Corduroy beneath the Burlap.
4.       Discover that the die I thought was identical to Jo’s doily die is much bigger than Jo’s and not suitable. ‘Not Happy, Jan.’
5.       Choose another large die and fussy-cut around the central part of the die-cut to make a suitable doily. Did I mention that I needed this card in a hurry? And that of course I had to find my metal  shim to use with the die?
6.       Discover that my flower die is much smaller than Jo’s but by now I am getting comfortable with changing things. Make three flowers, sponging Abandoned Coral ink around the edges. Shape the flowers and glue the layers together. Yes, this step took forever. And I got ink all over my fingers. But I am in my element now and enjoying the process.
7.       Choose a matching grey card for the leaves, and use a coral coloured alcohol marker to colour silver rhinestones. I have accepted this card will take ages – we’ll probably have baked beans on toast for dinner.
8.       Stamp three different wordings using VersaFine Sepia Ink, before finding one that I am happy with. First one was too big, second stamp is what I want but it stamped unevenly. Of course.
9.       Play with the layout of doily, flowers and wording. Take a photo before lifting things off to put mounting foam behind them. Thank goodness for phones with cameras on them.
10.   Change the placement of the final bits of bling because there are butterflies on the vertical paper panel and the groups of 3 stones won’t work.
11.   Admire the card made in a ‘hurry’ – yes it took far far longer than planned. And no we did not have beans on toast for dinner.
12.   Thank you Jo for providing the inspiration for this ‘quick’ card. It was for a paid order … wonder if I can charge for time ... is $80 excessive??


Thursday 12 May 2016

Birthday Vellum


It's my MIL's birthday today. Still inspired by the Clear & Sheer class and by Jennifer McGuire, I traced the Altenew flower and leaves in white pencil onto heavy parchment vellum. I embossed from behind then coloured (also from behind) using blue and grey Copic markers. I also printed the message from the computer and traced in white pencil, then embossed from behind. I adhered the sequins using Glossy Accents then put more Glossy Accents behind the sequins to adhere the small piece of white backing card.
I adhered a half card-sized panel to the inside of the card to support the vellum. Knowing the adhesive would be visible from behind, I embossed a line where it would be to make a feature of it.


Sunday 1 May 2016

Heat Embossed Acetate Slider Card


Another day spent playing with ideas from the Clear & Sheer class. I love cards that push the boundaries so this idea really appealed to me.

Stamp from StampIt.
Distress Inks and
Markers used :
Salty Ocean
Peacock Feathers
Wild Honey
Fossilized Amber
Ripe Persimmon


It was with some
trepidation that I
stamped and heat-
embossed onto a
sheet of acetate from
the local newsagent
(overhead projector film).
However all went well - I followed the class advice to minimise static on the sheet.

Saturday 30 April 2016

Embossed Acetate

Nothing like a class to get one motivated. I have so many new techniques I want to try. Here is my (prepared earlier) example of embossed acetate - with a twist. After embossing the acetate with a Dreamweavers folder, I filled the recessed areas in the back of the panel with gesso, allowed it to dry then cleaned off the overflow. A few brads to attach the panel to a dark paper layer, and voila!


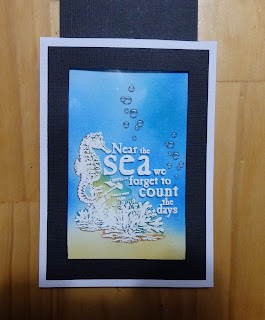
Clear & Sheer - Near the Sea


Inspired by Debby Hughes in Day Three of the Clear & Sheer Online Card Class I put this tag together today. I have stamped on the top die-cut acetate label tag with StazOn black ink using one of my favourite stamps from Stamp-It.
I coloured the card for the seahorse with alcohol ink (Wild Plum), and highlighted the ridges with a silver glitter pen. I die-cut a second seahorse from black Bazzill card.
I applied Stream alcohol ink and a bit of Wild Plum behind the stamped acetate panel. The second acetate panel just has a strip of Washi tape along the lower edge.
The plum seahorse is adhered to the front of the top panel and the black seahorse is adhered behind - slightly offset - to hide the adhesive.
I will probably put this onto a Belated Birthday card - a perfect excuse as we live near the sea - with a 'Hope it went swimmingly' message inside the card.

Thursday 28 April 2016

Clear & Sheer Day 2


I've finished my homework for Day 2 of the Online Card Class - I've chosen Dawn Woleslagle's technique of embossing onto parchment (vellum).


I traced with white pencil (sharp) over a Sizzix Framelits set stamp for the flowers and the butterfly.
I embossed the images from behind with a stylus, then coloured with Copic markers as shown on the class video.
I have hidden the adhesives used to mount the die-cut parchment shapes by using a hole punch to make three circles used behind the centres of the flowers, and cutting a bit the shape of the butterfly's body.
I also used the stylus to emboss the frame around the wording, and used a wide piece of double-sided tape that fit exactly behind the wording area.
The rest of the card is from a kit I had prepped for a class many years ago, plus a paper die-cut doily. See - there IS justification for not throwing stuff out! I DID use it one day :) I really like the way the doily shows through the vellum.
Bonus from the class - I now have both Mothers Day cards done.

Wednesday 27 April 2016

Second card for Clear and Sheer

This post follows the one below - it seems I need a new post in order to show a second photo :(


Tonight's card uses a technique I haven't been game to try before - machine stitching. I wanted the pink strip of card to make the coloured image 'pop'. I attached the stamped and coloured vellum strip with two vertical lines of pale pink stitching to the pink card strip, then adhered the card strip to the card front.

Clear and Sheer - Day 1


I am doing an Online Card Class featuring vellum and acetate. Today's session covered attaching vellum. Home after a busy day teaching, I have retrieved one card done earlier, and put another together quickly.


This card, from an earlier Pergamano class, has an A5 sized vellum panel, scored in half and folded then the front edges trimmed. The vellum layer is attached by hand stitching with silver thread along the fold line.


Tonight's card uses a technique I haven't been game to try before - machine stitching. I wanted the pink strip of card to make the coloured image 'pop'. I attached the stamped and coloured vellum strip with two vertical lines of pale pink stitching to the pink card strip, then adhered the card strip to the card front.

Thursday 18 February 2016