Wednesday 30 August 2017

Seashells - foiled


Still playing with (and still loving) the foiling. This card is the result of playing with the 'Foiling with Embossing Folders' option with the GoPress ... the possibility of using it this way was one of the reasons I decided to buy the machine in the first place.
And yes, you do see a new Hotfoil stamp -  I had been resisting a wording one but came to realise that I 'needed' one after all.
The foil on the shells is Blue Green Iridescent The foil on the wording is Sea Breeze Iridescent.
. The embossing folder was free with an issue of Love Cardmaking, as was the seahorse die (same issue). The 'Floral Ovals' die is Spellbinders.
I initially had the seahorse just as a foiled die-cut but the card lacked balance - much happier with the above result than this one:

Monday 28 August 2017

Less is More Challenge - Real Object - Coffeeeeeee


I just had to do this one - click HERE to link to the current Less is More challenge to see all the wonderful ideas from the design team, and the great entries.
I have had this wording stamp just waiting for the right occasion - and here it is!


And below are the eyeballs - yes they are coffee beans - added to with white gel pen.


The stamps were inked with Timber Brown StazOn - the wording is from Art Impressions and I think most people would recognise Tim Holtz's Bird Crazy stamps by now. The coffee beans are held on by sticky dots.

Off topic for the challenge, but ... As a serious (4 or 5 a day) coffee drinker, the following image strikes a real chord with me. Better than my usual MS reaction of feeling noises as pain.


This brings back memories of when I was studying for uni exams - cramming until 3am some days - living on coffee. My brother and I used to hide from each other in a particular niche in the kitchen and try to scare each other as the victim walked past. I was going from bathroom back to bedroom with a pair of slippers in my hand - he yelled 'Boo!' and I was totally caffeinated and instead of jumping, whacked him with the slippers! That surprised both of us. A very 'not-me' reaction.

Sunday 27 August 2017

More foiling, more Blue Fern paper


Photo with flash
Photo without flash

Photo outside, sunlight, no flash

Continuing to find new ways to play with foils. Today's card uses Petal Pink Foil (Iridescent Finish) and another panel from the same paper as in yesterday's post. A few sequins - iridescent but picking up the pink in the paper - and some Orchid Brilliance ink swiped around the edge of the paper layer. "Simples" as the Meerkat would say :) All the foiled die-cuts are two or three layers thick. The flower dies are from the Sizzzix Tim Holtz Wildflowers set. Not simples was getting a photo that actually dos justice to the card. Not happy with any of these.

Totally off topic - but how cute is this little guy (or girl) ?? Yes it is as close as it looks - he/she visits our back fence every day with three adult grey butcher birds.


Saturday 26 August 2017

Blue Fern 'Happy Accident' Fortuity


Same card, more reflection
Same card, most reflection
shows off the Rose Gold


Playing today with gorgeous heavy weight 'paper' (it feels more like card) from Blue Fern. I used one of the four panels primarily to demonstrate the foiling with Hotfoil stamps technique.

This is the panel after foiling.

Product used:
Blue Fern 'Happy Accident' - Fortuity
GoPress Foil - Rose gold Bright (supposedly Iridescent Shavings Pattern which I can't see)
Couture Creations Anna Griffin Hotfoil stamp - Thorny Branches
Marianne Design - Collectible Dies - Birds COL1311
Distress Oxides Ink - walnut stain
Distress Inks - peacock feathers, gathered twigs, antique linen, hickory smoke
Kaisercard CD161 - Lagoon


Stamps used are from a set which came with the UK Creative Stamping magazine Issue 41 (this is still available to order through Practical Publishing)


Thursday 24 August 2017

The finished Thank You card, and the Frame from previous Foiled post


Here is the finished Thank You card used in the 'How To' photos in the previous post. As I post this I can imagine my now 36 yr old daughter saying "My two favourite colours - purple and shiny!"
The frame for this card was easy (eventually) - I had planned to use a Romantic Rectangles die to press silver foiling onto a matte silver card frame that I had cut to card front size - 10.5cm wide x 14.8 cm high - but I botched it by trying to patch together small scraps of foil and failing to align my card over the die.
So I simply adhered strips of 6mm wide double sided tape along the four edges of the botched layer and dabded the not-pretty side of my silver foil onto the adhesive. Easy peasy - and a great way to use the pieces saved after foiling the Thorny Branches part of the card.
I used a craft knife and my Tim Holtz metal-edged ruler to cut out the frame which I then adhered to the card front.


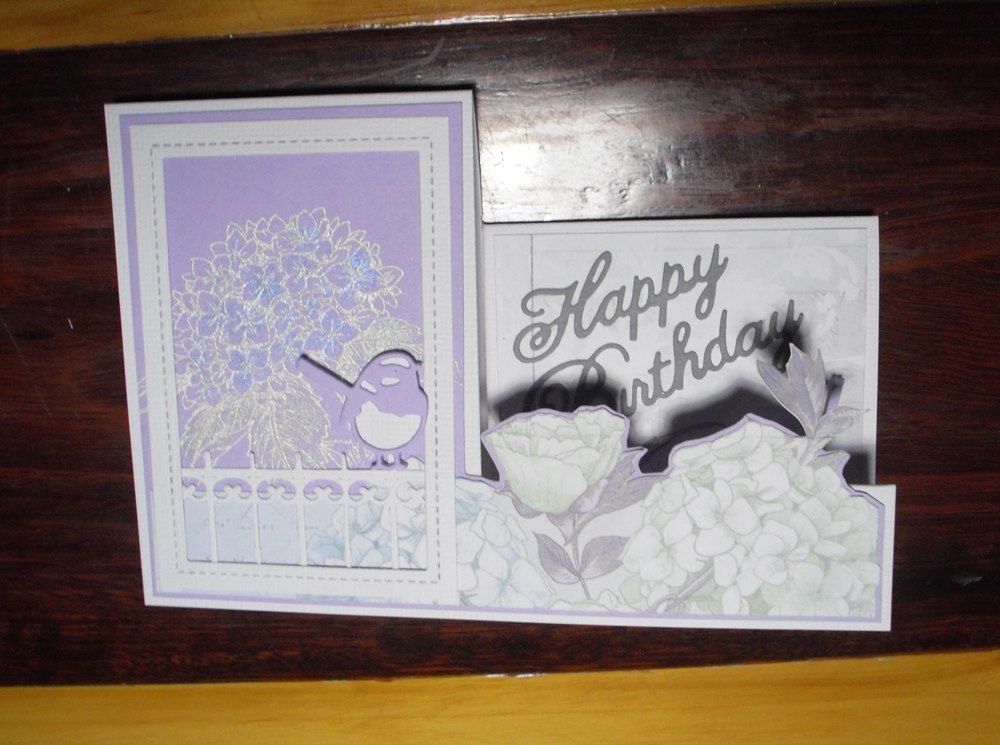
 I have also been asked to show how the frame from the Happy Birthday card from the Foiled post was done - so here is the technique.

To get this effect you will need:

  • Lawn Fawn dies Outside In Stitched Rectangle Stackables - largest die
  • matte silver card (e.g. Stardream) 10.5 cm wide x 14.8 cm high
  • die-cutting machine such as a BigShot
  • latex embossing mat or mats (e.g. Spellbinders Enlarged Embossing Pads or Couture Creations 5" x 7" Universal Embossing Mat)

Make sure you choose the correct instructions for your latex mat/s. If you are using a single latex mat go to the lower set of instructions (sorry those are without photos).

To use a BigShot and the two Spellbinders tan mats:
Have your BigShot platform at Tab 2. Please note I have peeled the sticker and wording from my Tab 2 layer on my platform due to a cutting-side-down die incident.
Lay the Lawn Fawn die on the platform cutting edge UP.


Align the cardstock, good side UP, so that the top, left and right edges are just framed by the die. Yes the bottom edge does go beyond the lower edge of the die.


Holding the card layer in place, position the tan mats over this with the lower edge of the mats about 2cm or 1" higher than the lower edge of the die. Mine here is still a bit too low. You must not emboss the lower die edge onto the card layer as it will be too high up the card.
Without letting go of the card layer, use your other hand to hold the mats in place then carefully remove the hand holding the card layer.
Now put the two or three pieces of cardstock shim that you would always use with the Spellbinders tan mats over the layer, then add ONE acrylic plate with lower edge in line with tan mat lower edge.
Wind the platform through the BigShot.
Remove tan mats, shim and acrylic plate.


Move the partially embossed card layer up in the die so that the bottom, left and right edges are now framed by the die. Slide the layer slightly up or down until you feel the already embossed ridges at the sides of the card lock into place.
This time position the tan mats over this arrangement with the upper edge of the mats over half way down the card and frame. Add shim and acrylic plate and wind through BigShot as before. You must not cover or emboss the upper (already embossed) half of the card.


Now use a sharp craft knife and metal ruler to trim the frame from the card. My frame is 1/4" or a little bit wider than  6mm. Yes I am eyeballing it rather than measuring.

I suggest leaving the layer in the die while you trim so that you don't squash the embossed edges.

Yes this is a bit fiddly. Or you can cut it then re-emboss any squished bits.


To use a BigShot and one Couture Creations 5" x 7" Universal Embossing Mat:
You can still refer to the pictures above - just visualise the platform with the top flap opened out to Tab 1 and an acrylic plate under the layer shown, and leave out the pink card shim layer.

  1. Have your BigShot platform at Tab 1.
  2. Add one acrylic plate.
  3. Lay the Lawn Fawn die on the platform cutting edge UP.
  4. Align the cardstock, good side UP, so that the top, left and right edges are just framed by the die. Yes the bottom edge does go beyond the lower edge of the die.
  5. Holding the card layer in place, position the tan mat over this with the lower edge of the mat about 2cm or 1" higher than the lower edge of the die. You must not emboss the lower die edge onto the card layer as it will be too high up the card.
  6. Without letting go of the card layer, use your other hand to hold the mat in place then carefully remove the hand holding the card layer.
  7. Now  add your second acrylic plate with lower edge in line with tan mat lower edge.
  8. Wind the platform through the BigShot.
  9. Remove top acrylic plate and tan mat.
  10. Move the partially embossed card layer up in the die so that the bottom, left and right edges are now framed by the die. Slide the layer slightly up or down until you feel the already embossed ridges at the sides of the card lock into place.
  11. This time position the tan mat over this arrangement with the upper edge of the mat over half way down the card and frame. Add acrylic plate and wind through BigShot as before. You must not cover or emboss the upper (already embossed) half of the card.
  12. Now use a sharp craft knife and metal ruler to trim the frame from the card. My frame is 1/4" or a little bit wider than  6mm.  I suggest leaving the layer in the die while you trim so that you don't squash the embossed edges. Yes this is a bit fiddly. Or you can cut it then re-emboss any squished bits. 

Wednesday 23 August 2017

Foiled

After a brilliant Brainstorming Workshop with Wilna at Frendz I have had a chance to play.
Using my GoPress & Foil machine, I made this card.


I first used the Anna Griffin Thorny Branches Hotfoil stamp and silver foil.


 I then printed the wording as follows:

  • GoPress&Foil platform (heated)
  • Metal Shim
  • Paper layer (that already has the silver branches on it) placed face up
  • Purple Foil (cut to the size of the chipboard word)  placed pretty side up onto paper layer
  • Chipboard wording with the right side up onto the paper layer
These photos go through the steps mentioned above ... I have used 'Thank You' instead of Happy Birthday as I need a thank you card!


Platform with hotfoil stamp, foil and paper. Over this goes my shim - for me a thin card layer from a muesli bar box and a thick card layer from a Lauke bread mix box. Close lid, heat, and wind s l o w l y through my BigShot.
This shows the chipboard wording resting on the foiled layer as I work out the placement. Before putting this onto the heated metal shim I insert the Phantom Purple foil piece under the wording, and remove the metal die you see framing the piece. 
Hopefully here you can see the metal shim, with the paper, foil and chipboard word inside the platform. Once the light has returned to green I wait about 30 seconds then run (or maybe I should say walk - slowly) it through the BigShot - no extra shims.
The layer after it has been through the BigShot.
Preparing to die-cut two butterflies. Two strips of 12mm double-sided tape (Ultimate Crafts DieCut'NBond is better but I have none)
Die-cut two butterflies, poke out all the 'bits', peel off the backing from the adhesive layer and press scraps of  Phantom Purple foil over it until all the adhesive parts are covered.
I will add a photo of the finished 'Thank You card' shortly. 
If anyone is interested in how the frame was done please ask in the comments and I will add photos of those steps. It is done using a Lawn Fawn Outside In Stitched Rectangle die, embossed onto a pre-cut matte silver card frame piece.

Friday 28 July 2017

Step By Step


Same card - closed. The hydrangea is from a StampIt
set, coloured with Perfect Pearls.


I have not made step cards for ages, but was recently inspired by Collette Mitrega's YouTube tutorial for a quick 1 Minute Step Card.
I love the speed of this process - but had a few OCD cringe moments - even though the front layer mostly covers Collette's residual fold line across the left-hand panel, I know it is there. The bigger-than-needed cut in the back panel also annoyed me. All this started me thinking about how I could streamline the 'measure-and-mark' process I had been taught for step cards.
My latest paper purchase gave me the push I needed. I bought 2 sheets of  Kaisercraft Lilac Whisper collection 'Mauve' and a matching Collectables pack plus 2 A4 sheets of matching lilac card. From each sheet of Kaisercraft paper I will get at least 5 cards, possibly 6. I reckon that is pretty good value.


I  wanted to use specific parts of the paper for a number of step cards. I also wanted to use my new Lawn Fawn Outside-In Stitched Rectangles die. This meant designing the steps around the paper panels.
The tools I used were a Martha Stewart Scoreboard, a cutting mat, a craft knife and my Tim Holtz ruler. (You can use a metal ruler).

Lots of my beloved 'fussy cutting' - yes I did cut around the
three central hydrangea blossoms.

I moved the butterfly to the lower front of the card
and added a finch as a hidden surprise.


Another card, using some Collectables, Stickles applied with a toothlick,
and a StampIt hydrangea stamp and Perfect Pearls.

I found that if I started with a standard A5 card base and put in partial score lines as a guide I could then cut to fit the panels and extend the score lines. In the diagram below, score lines are shown in black and the cutting line in orange. Can you tell yet that my Dad is a maths teacher and I am very much my father's duaghter??

Done first is the top score line. It is at the centre of the A5 card base - 4 1/4" from each end, and comes down about the width of what I want on the left-hand panel. Lay your intended panel on the card base as a guide.
Next are the lines that will start the step - one score line at either 1" or 1 1/8" from the left edge and coming up to about 1/4" short of where you think the cutting line will go, and a second line the same distance further across - at either 2" or 2 1/4" from the left edge of the card base.
The third score line is halfway between the second line and the right-hand edge of the card base.
Now use a tiny pencil mark to show the start and finish of the cutting line - the measurement down from the top edge of the card base will be the width of your intended  left-hand panel layer plus whatever border you want around it. (For example my panel is 2 5/8" wide so I lay my ruler on the 1" score line and mark the start of the cutting line 2 7/8" down from the top edge. Then I lay the ruler on the last score line and again mark a point 2 7/8" down from the top edge for the end of the cutting line.
Use craft knife and ruler to cut between the two pencil marks. Then return the card base to the scoreboard and re-score all score lines so they reach the cut line edge.


Friday 23 June 2017

Another snail ...

Thanks Deidre for the inspiration for this card and Shirley (again) for the clouds:


Using your computer

Following up from introducing a group to using their computers as an aid to cardmaking, I thought I would do a step-by-step as I make a card for the latest CAS(E) this Sketch challenge.
We had just been looking at a fun card given to my son 2 months after his birthday.
I have a cute little Memory Box snail die I bought AGES ago and have never used. I wanted the idea that the snail had had to climb Everest on his way ..
I found a printable image of Everest and tweaked it a bit using PhotoScape.
Usng Word and setting the size of the image to 8cm wide I printed it and cut carefully around the mountain. This gave me two panels to use for masking - the mountain, and the surrounding sky.
Again in Word I typed the text I wanted into a text box, and printed it onto the card panel.
With the mountain mask in place I layered Distress Inks from dark to light down from the top of the panel - salty ocean and tumbled glass. I also used my brand new MFT cloud stencil (Thank you, Shirley!) to add some clouds lower down.
I removed the mountain mask and attached the sky mask, then used the cloud stencil again upside down for the mountain ridges using hickory smoke Distress Ink.
Added a trail of clear glittery stencil paste for the snail slime, a die-cut snail with gelly roll pen highlights, and voila!